How to create a Style in Illustrator using the Appearance
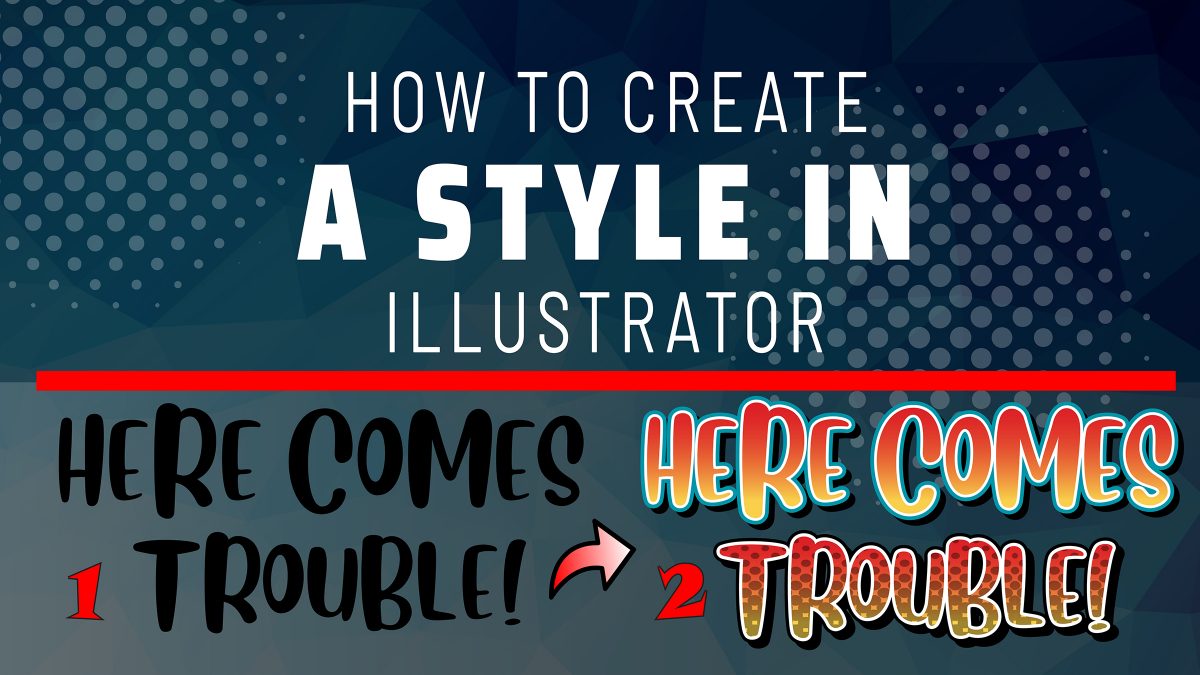

Hello, everybody. This is William Speedy Sep. And today, I’m going to showcase how to create a style using the Appearance panel in Adobe Illustrator.
The first thing you want to do is select your type and choose a font of your liking. For this video, I select the font called blueberry.
Once you have typed the words, I like to empty the fill from the dock menu, only because you have the option to use a fill in the Appearance. This keeps your file better organized. If you can’t locate the Appearance panel, simply find it in the menu in the window, then scroll to the Appearance.
You can paint the file any color you want. For the purpose of this video, I’m going to choose a gradient. You can also manipulate the gradient, angles, and colors.
I’m going to add a White stroke out of the Appearance panel. Let me change the background color so you can see it better. You can change the number of points in the stroke. And by clicking on the word stroke, you can change the corners to a round or pointed.
Notice that the stroke on the letter E is starting to get closed in. But if you change the layer position of the stroke in the panel behind the fill, it opens up. This is because the outline stroke is centered between the outside and fill.
I’m going to create another stroke by dragging the previous stroke to duplicate an icon and change color and increase the points.
I then we’ll repeat the steps with another stroke and color it Black. But this, the time I’m going to use the Add New Effect button. I would choose to Stylize then Drop Shadow. You will get a Drop Shadow panel that opens right away. Make sure you turn on the Preview button.
So, in Mode, I will choose to Multiply. You can change the Blur or Offset. But for the purpose of this video, I will leave the Blur at 0. I want to create this more comic book sort of style. So, I’m going to leave the Blur out.
Once you create your Appearance, you can open up your Graphic Styles on the window. And in your Graphic Styles panel, you’re going to drag your selected Appearance that was created. You notice your Styles were added to the panel.
Now select the word ‘Trouble’, and now with ease, you can apply the new style created. I’m going to alter the style a little bit by changing one of the strokes to Black. So, now, I created a rectangle tool and I applied a preset gradient from the Graphic Styles. Then go to Effects, Pixelate, Color Halftone. I will set the angles at 45 across all the channels and change the Max Radius to 35 pixels, then hit OK.
Then go to Objects, Expand Appearance, then out of the Image Trace panel, which is located in the windows, Image Trace. Make sure to select Preview and Ignore White. You can use the sliders to alter the look of your bitmap.
Once you are happy with the results, just hit Expand. This converts your bitmap to a vector. Simply drag your vector object into your Swatches to create a New Fill. Notice you cannot drag your vector halftone into a Style.
Now that you have created a New Fill in your Swatches, you can add a New Fill by selecting it out in the Appearance panel. I’m just going to set it to Multiply and change the Opacity of the new halftone fill.
You can alter the location of the halftone and effects. Go to the Distort & Transform, then Transform. Select Preview and uncheck Transform Objects. You can alter the sliders to your liking it. Hit OK.
And when you’re happy with your results, just simply drag the new Appearance into your Graphic Styles panel. What is good about the Graphic Style is that you can reapply to any text or curve by just 1 click. Look and see as I cycle between different Graphic Styles.
So, if you found this tutorial helpful, feel free to give it a thumbs up. And remember to hit the Subscribe button for updates on future videos. Until then, thank you for watching and have a great day.
Hey, have you tried Speedy Sep ?
Try if free for 7 days and automate your print shop.
deadline

No credit card required.
